


So you bought a new iPhone. A fresh iPhone XS out of the box. Therefore, you want all your data on your new device. Moreover, you have your old iPhone with all of those precious photos and stuff in it.
How should you transfer thousands of photos from your old iPhone to the new one? Today, I am going to teach you 5 ways through which you can transfer photos from iPhone to iPhone.
*Note*: This method applies to all apple devices: iPhone X, iPhone 8, iPhone 7, iPhone 6, iPhone 5, and iPhone 4. This also applies to the plus models.
So why would you want to transfer photos from iPhone to iPhone? Well, there can be certain reasons for that.
- You want to make a backup of photos.
- You might want to share some of interesting photos will friends or family.
- You want to transfer all your photos in new iPhone you just bought.
There are multiple ways you can transfer your iPhone photos to another iPhone. But all those methods are slow. Imagine using Bluetooth in 2019. How funny is that?
Therefore, there should be some ways of transferring photos from iPhone to another iPhone in bulk and with ease and precision. No matter what's the cause, I'm sure that you're reading the right article.
Transferring photos from one iPhone to another is rather simple. In our article today, I will teach you 5 ways of transferring your photos from one iPhone to another.
Method 1: Air Drop
The requirement to use Air drop is to at least have an iPhone 5 with IOS 7 or later versions. So what is Air Drop? It's a built-in iPhone feature through which you can easily share things with other iPhones.
Air Drop is recommended if you have a limited and less number of photos to transfer. However, if you have hundreds or thousands of photos ready to be shared. In that case Air Drop isn't recommended one bit. Moreover, it is an effective way to transfer photos from iPhone to iPhone. So how to use Air Drop. Follow my steps.
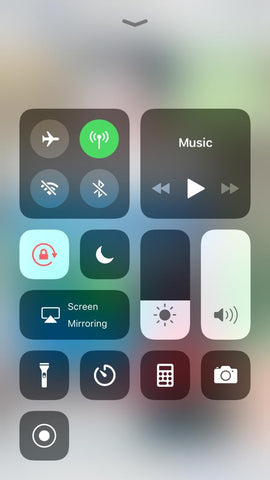
Step 1: Enable Air Drop on both of the iPhones.
Swipe up from the bottom bezel of your phone. You will launch control center. Press and hold your finger on the first box in control center.
You will go further into the box menu. There, you will see Air Drop option.
Click on Air Drop and choose contact or everyone. It's up to you.

Step 2: Select the number of photos that you want to transfer from iPhone to iPhone.
You can select those photos into the iPhone photos app. Tap on the share option on the photo/photos. The Air Drop option will be shown right there.
Step 3: Receiving photos from iPhone
Air Drop will pop up to the receiving iPhone and it'll ask whether you want to accept photos from that iPhone or not. Just accept them and you will start to receive these photos. This is the simplest method to receive photos.
But what if you want a whole bulk of photos? What to do in that situation? You can use a computer as the bridge between two iPhone. There are many software available all across the internet but the one I am going to recommend today is Any Trans.
You can download Any Trans with this LINK. After downloading and installing it in your PC follow the steps below.
Method 2: Transfer with Any Trans

Step 1: Connect both of your devices to AnyTrans software.
Run AnyTrans on your PC and then connect both the device with USB cable. Go to the Category page. There you will see a bunch of categories such as images, videos, documents, messages and apps.
Step 2: Select all the Photos that you want to transfer.
Select the album > Select all the photos or folders that you want to transfer.
Step 3: Now just transfer photos to the new iPhone.
Select all the photos that you want to send to the other iPhone and select "Transfer photos to another iPhone" button.
But what if you want to transfer all photos at once? Well, AnyTrans has a one click select feature too. So follow my steps if you want to transfer all photos with just one click.
Transfer with one-click
Step 1: Connect your devices and choose phone switcher option.
Open AnyTrans and click on phone switcher option. Go to the phone switcher option after connecting both devices and launching the software.
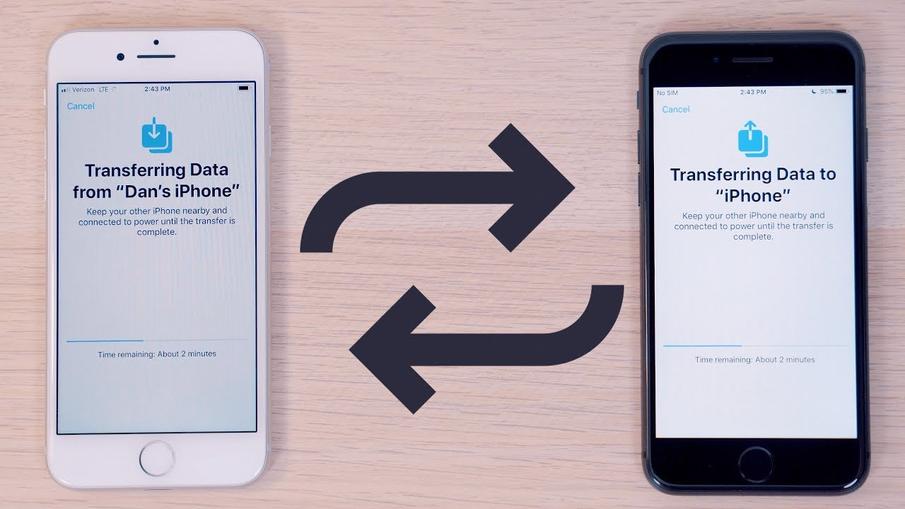
Step 2: Confirming the request from target iPhone.
After reaching on phone switcher page. Select the sender device along with the receiver. After that just click 'Next'.
Step 3: Transferring photos from one iPhone to the other.
Select the items that you want to transfer and click 'Next' to transfer all photos from one iPhone to the other. It's pretty simple yet powerful and fast.
And BOOM! You have successfully transferred photos from one iPhone to the other.
Method 3: iCloud

ICloud
is one of the best feature that you get with Apple devices. This is because iCloud provides a bunch of features to its users. ICloud photo library has the feature where you can sync all photos all across the IOS devices.
With an All Photos section, it has removed our traditional way of seeing albums. There are no restrictions either. Therefore, you don't have to worry about your photos getting deleted.
Moreover, you should follow some of my tips before starting.
- Both of the devices should be in IOS 8.3 or Later
- Both of the iPhones should have iCloud Photo Library enabled.
- Both of the devices should have same Apple I’d.
- You have to be connected to a Wireless connection to download content or upload photos.
- You should make sure that the storage of iCloud is enough in contrast to images being put in.
Now let's move on further with the steps.
Step 1: Login into ICloud
Go to Settings > Tap on your Apple Account > Tap on iCloud > Tap on Photos.
Step 2: Turn on iCloud Photo Library
Turn on iCloud Photo Library button on.
Step 3: Photo Quality Settings
Choose the “Optimize iPhone Storage" or " Download and keep original". Choose any of these options.
Step 4: Upload the Photos
In normal circumstances, it takes a very long time to upload photos on iPhone. This is because, uploading solely depends on your internet connection. So if you're using a super-fast internet, you'll be uploading pictures in no time.
After you're done uploading, you will be able to upload these photos in All Photos section in the iPhone's Photos app.
Method 4: iTunes

Everyone is familiar with iTunes. From everyone, I mean every iPhone user. ITunes is a mobile management software for both windows and mac. Its main purpose is just a media player but it can do so much more than that. You can upload music or images or transfer it from one place to another. So let's see how we can do it.
We are going to divide this part into two. One of MAC OS and one for Windows.
MAC OS
Using Photos app, you can import all your photos from iPhone to Mac. Connect your iPhone to Mac via USB cable. Launch the photos app. Pick all of the photos that you want to transfer. Click on import or import selected to transfer photos from iPhone to mac.
This is the method for Mac users. It's fairly simple and easy to use. Therefore, having mac is plus point for transferring pictures from one iPhone to another.
Windows Users
For windows users, you can transfer it using the auto play feature. Therefore, connect your iPhone to the Computer using data cable. Click import pictures and videos. You should do this when the auto play window appears. Choose the destination where you want to save those images and select import.
You've now successfully imported all the images right into your PC.
So how to you transfer those images to another iPhone?
How to Transfer photos in other iPhone
Connect your new iPhone to the computer with USB cable. Open iTunes software. Click the device button that will be in right corner of the screen. Select photos. Click on Sync Photos from Application or Folder and click Apply.
Now you've successfully transferred photos in other iPhone.
Some other methods which you might want to try
These were the top five recommendations for transferring data from iPhone to another iPhone. But there are others too. Therefore, if you're not interested in the upper ones, you can check these cool methods out.
There can be a lot of circumstances where one might want to transfer data from one photo to another. Having an iPhone can be pretty stressful as most people do not know what their phones are capable of.
When there is no other option available. You can use Email. People use Email to send or receive different contents with ease. This method is so straightforward. All you need to do is to Email yourself the images you want to send to the other iPhone. Sending an Email is straightforward and you'll be done in literally no time.
Step 1
Compose an email to yourself. Therefore, it'll take some time but it'll be done too. After it's done you have to follow the step two below.
Step 2
Now all you have to do is to open the Email account from your new or other iPhone and download attachments from there. You can do that by accessing you sent folders in iPhone mail app and downloading attachments from there.
Method 5: Touch Copy

It is one of the most easiest and reliable method of transferring photos from iPhone to iPhone. Touch Copy is an all in one software that is must recommended for you. You can manage all your iPhone with the use of Touch Copy. You can copy all kinds of data such as music, photos, images or videos. The list goes even further more.
Also, you can store contacts, messages or even call logs. Touch Copy words offline so you don't have to worry about being not connected to a Wi-Fi network.
Therefore, we are going to talk about how you can transfer photos from one iPhone to another iPhone using the Touch Copy tool.
- Open Touch Copy and then connect your iPhone with it.
- Click on Photos.
- Select Copy Photos.
- Once it's done, you have to close both your device and the software.
- Now connect your new iPhone and open iTunes.
- Click the Device button in iTunes
- Click Photos
- Select Sync Photos from Application or Folder
- Select Apply.
There you have it folks. You've successfully copied all of your photos from one iPhone to the other.
Bonus: 3U tools

3U tools is another recommended tool you might want to try to have access all over your iPhone. There are many cool features to try. You even have the option to live run your iPhone on PC software. Therefore, 3U tools is pretty cool too. So how do you transfer data from old iPhone to new iPhone?
You've got a brand new iPhone. Now all you have to do is to transfer your data from old one to the new one. 3U tools make things pretty easier for you to transfer photos from one iPhone to another.
Step 1: Connect your old iPhone to 3U tools.
Step 2: Select transfer tool in the toolbar.
Step 3: Connect your iPhone device on the new screen.
Step 4: Select the photos that you want to transfer.
3U tools is not only limited to images. Moreover, you can even transfer videos, music, SMS, contacts, call logs and even apps from your old iPhone to your new one.
Now you just have to wait for the process to be done. It's fairly easy and simple. It's pretty fast too. And BOOM! You have transferred data from one iPhone to another.
Conclusion
The conclusion to all that is that you have many more options in addition to Apple's methods. Therefore, you can use third party software and some other techniques to transfer data from old iPhone to the new one.
These software have made it easier for us to transfer data. If we bring it back to the past, people would bring their iPhones in shops to have them backed up yet alone transferred from one iPhone to another. We will keep you updated with any new software that we'll find worth sharing and we will share all those with you.